Join Amazon Prime! (Affiliate Link)

Saturday, January 28, 2017

Made-Up: Juvia's Place The Saharan Palette (REVIEW)

Juvia's Place released some of their Saharan palettes early on Jan 24th, and I was so on it (thanks to ColourPop Cult on IG!) It shipped the next day and I had it in my hand on the 27th (Friday). Yay!! They will still be doing the full launch on Jan 30th. 

Box cover


Inside (duh, right?)

I did some packaging/palette size comparison shots between all of their palettes. It's one of their smaller ones. 

L-R: The Masquerade, The Nubian 2, The Saharan, The Nubian

Same palettes stacked to see size differences

Inside of all palettes

In terms of formula, and only finger-swatching, they feel so good! Smooth and buttery and super pigmented without primer. Wodaabe and Senegal literally feel so therapeutic, lol. The only 2 shades I had issues with were Jamila and Zoya. I had to swipe many times to get good color pay-off whereas the other shades, one swipe was enough. It's actually weird that they weren't consistent with the others. 


Pretty swatches

I found after ordering it and having just received the Kylie Royal Peach (and it fresh on my mind), that some shades could be similar. I did some swatch comparisons today and there are indeed a few shades that are.

Saharan on top, Royal Peach on the bottom

Comparison shot
Please check out my YouTube videos, like and subscribe!:

The Saharan


Comparison video

Update- I am actually wearing the palette today (Jan 30th). I used Sokoto, Wodaabe and Katsina. All applied well on the lids as well. I usually apply my lid color, blend, then go back in with the color again on the parts I want more intensity. I did that with Sokoto. I put Urban Decay's Primer Potion on my lids and NYX's Glitter Glue only on the part I wanted to apply Wodaabe since it's a metallic shade. 


Kifana

Wednesday, January 25, 2017

Made-Up: Kylie Cosmetics Responded About the Chemical Smell of the Royal Peach Palette

There's a lot of buzz going around about the chemical/spray paint odor permeating from this palette. I address it in my YouTube video (check it out, 3:33 mins in). It didn't bother me at first (call me crazy) but because of all the hoopla online, I may have gotten a bit concerned so I decided to email them not too long ago, they responded in 15 minutes! Here is what they told me (and everyone else who inquired, lol):
"Hello Kifana, 

Thank you for emailing us! We really appreciate your feedback as we are always trying to improve.

Rest assured, your Royal Peach Palette is 100% safe to use! We have spoken with our Quality Assurance Team and they have informed us that the smell may have been caused by the palette being enclosed during transit.

We recommend keeping your palette open for 24-48 hours to diminish the smell. This is safe to do as long as you store your Royal Peach Palette in a cool, dry place away from UV rays!

We hope this helps out!

Thank you,

--
Best, Cristian O
Team Kylie Cosmetics"

I'm going to try that and update my post in a few days, although I have seen people on YouTube say they've tried it and it still has that odor. I wonder if this will turn into a "thing" like her lipstick brush applicators last year? In the meantime, check out my Instagram post with swatches or this YouTube swatch-only video (with some ColourPop Pressed Powder Shadows).


Made-Up: Sigma Dry 'N Shape Spa


I ordered the Sigma Dry 'N Shape Spa last week because the title of their email caught me: "OMG, it's BACK!" I was like "What? What??!" I actually didn't know about it before that to know it was a new, hot item that sells out faster than they can keep it on the shelves. I was in the market for a better way to dry my brushes so I was intrigued. I currently lay them out on a hand towel with the brushes hanging over the edge of the surface so they don't get flat and air can get to and through the bristles. The issue is space and worrying that my kids will touch them while drying. I had a couple brush trees in my Amazon cart for months that I never pulled the trigger on so when the email came, it was at the right time. I first had to inquire on their website in the Q&A section how the brushes got dry being enclosed in an elastic band and they responded that it has moisture-wicking technology. Which intrigued me even more, so I ordered it. Their delivery is super fast. I placed my order on Thursday January 19th and got the shipping confirmation that same day and it was delivered on Tuesday January 24th. I checked it out last night and it's very compact. I actually did a mini demo (without water) last night on my YouTube channel, check it out. When I actually use it I'll update my post.

Tuesday, January 24, 2017

My YouTube Channel and Filming Stuff

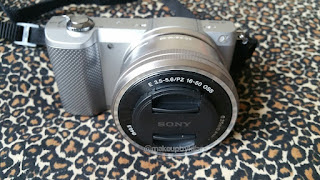
Hi. Long time no post. I swear this blogging stuff looks a lot easier as a bystander, but I'm going to keep at it! I recently decided, on top of everything else I can't keep up with, to boost up my YouTube channel. My sweet hubby bought me a Sony a5000 camera for our 12th wedding anniversary in December and I decided that was all I needed to get full force into my YouTube channel. The truth is most vloggers use what they have, such as their phone, and you don't need a fancy camera. But I kept telling myself that I needed the "perfect equipment, environment, etc", which lead to very little videos other than swatch videos, which get a lot of hits (depending on the brand), but I wanted to actually sit in front of the camera. So I decided to buy a ring light (after great deliberation) to take great shots and to be able to film in proper lighting when the lighting situation isn't cooperative. That was something I struggled with in my previous videos. I also purchased other equipment that I list below. 

The Amazon links when I reference a product are affiliate links, so I appreciate your support in advance!

Camera Stuff

Camera
- Sony a5000 Mirrorless Camera

I love the camera, it's like a DSLR but without the bulk, so perfect for vloggers. It's 20 MP and has a flip up screen so I can see myself while recording and for selfies, which we know is important for beauty bloggers. I'm still struggling with figuring out the settings despite practically living on Google and YouTube researching. It's coming along though. One thing is the auto-focus, since I take a lot of makeup swatches, I notice that the camera struggles to keep up when I try to show them. I actually noticed this with my previous camera, which also happened to be a Sony (Cybershot, so regular point-and-shoot). The camera also doesn't have a hot shoe mount on top or a mic input. I solved the lack of hot shoe with an attachment, or should I say contraption. I speak about it below. I bought the 2 yr Best Buy extended warranty right before the return period ended just because I'm paranoid. I don't typically rush to purchase extended warranties but this camera causes me anxiety, ha!


Took a pic of my camera while reviewing a video. It shows the flip up screen.
Case
- I needed a case so I ordered the Sony one from Best Buy to pick up in store only to realize that it's bigger than I thought it was! I don't check dimensions, which isn't good. What is good is it's perfect to put all the little doo-dads related to the camera and filming. I currently have my big mic in there, it's stand and cord (more about it later), my mini tripod, the camera in its case and the adapter. I still needed something to just protect the camera, so I searched Amazon and saw this Andoer Camera Case. I absolutely fell in love because it had that vintage/retro vibe. Aside from aesthetics, it's perfect and protects the camera well. The added strap makes it look like a crossbody bag! Here's the Sony case previously mentioned, on Amazon.

SD Card
I got the camera right before travelling to Canada for the holidays, so I hastily ordered any old card from Amazon that was cheap ($19.99), which was this Sandisk 64 GB Class 4. It works fine, but for faster read time and to make sure the camera can handle what you throw at it (and especially for HD recording), I boosted to a Sandisk Extreme Class 10...which was only $5 more. I wish I had the time to research before and make the best choice in the first place. Anywho, I get the new card today.

Shooting Stuff

Video Tripod
I decided on the Amazon Basics Tripod because it was $16.99 and I don't plan to use it outside the apartment. It's really light, so if you're looking for a heavy duty tripod, this isn't the one. A light Summer breeze will blow it away. But it has a level and quick-release, so it works for me.

Vlogging Tripod
I got the Manfrotto Pixi from Best Buy. It's so cute!! So far I haven't used it for vlogging but I did use it for a close-up swatch video once. My fellow blogger boo Keishak uses this one and she was all up and down GenBeauty Vlogging with it. Here it is on Amazon.

Ring Light
After much research and finally deciding that I didn't want to invest in a $300 ring light, I bought the Neewer 14" LED Ring Light bundle for $116 because it was more bang for the buck with what you get, especially being an LED light and not fluorescent (newer technology). I didn't feel I needed the 18" for storage, space (I live in a small apartment) and travel reasons as I plan to use it for makeup gigs as well. I always end up in horrible lighting to do faces. The bundle has since sold out as you can see, but back in stock on Feb. 1st at the time of this post, but for $136. The light doesn't come with instructions but it was pretty easy to figure out. Set up is a breeze and the light makes my pics and videos look great (pics below for reference). The phone holder works with my Samsung Galaxy Note 4 and the remote as well (no need to download an app). It also comes with a good carrying case for the ring light, but not for the included stand (yes it came with the stand!) I see a similar 18" bundle available now. I also purchased the SquareTrade extended warranty.

Backdrop & Support

Living in a 2 bedroom apartment and not having a fancy makeup room makes filming a bit hard and it was also an obstacle that prevented me from recording. I don't ever have a nice, pretty, uncluttered background. So last week I ordered a backdrop from eBay that caught my eye. Then ordered a backdrop support since I don't film in front of a wall that I can tape the backdrop to. I decided on the Neewer Backdrop Support System because it was the least expensive, had good reviews and came with the actual backdrop holders (some didn't). I had bought some spandex material (2 yards) from the Garment District to use as a backdrop while waiting for the one from eBay to be delivered and tried it on the support and realized I needed clamps, so I ordered the LimoStudio 6-pc Backdrop Background Clamps, it's Amazon recommended and a good price. They work great and I filmed my first video with all this stuff yesterday. See it here (may as well subscribe now too :))

Editing Software/Apps:
I purchased the Corel VideoStudio Ultimate X9 [Download] because I saw it pop up as an Amazon deal for $19.99 while I was knee-deep into researching software. I took it as a sign, because quite frankly, I was flustered at this point...or call me cheap, ha! Seriously, video editing software is EXPENSIVE. Prior to this I usually used the YouTube Editor so a full program takes getting used to. With each video I'm learning more though. I also downloaded two editing apps on my phone, Adobe Clip and FilmoraGo to use in addition to the other apps I use in general to watermark and label my stuff. These are for videos and pics that I take with my cell phone. They produce more professional looking swatch videos on my channel compared to my previous ones. 

Microphone
I hastily bought the Blue Snowball iCE Condenser Cardioid Microphone mic before realizing that I needed a mic input in my camera to use it while recording and mine didn't have one (wah). I still kept it to do voiceovers though. It's rated as a good mic in its category on Amazon and in an article I read, and I haven't had any issues so far, but it's not a travel mic. It's a big heavy ball, lol. It comes with a stand which I hold while doing my voiceovers. It fits in my camera bag though!

Table
I got a TV Tray from Target because I wanted something small and fold-able that I can put away when not in use to put my products on while filming. I saw another YouTuber use one of these in her video (she lived in a studio). It's perfect, although a little shaky. What do I want for $8 right?

Misc. Stuff
I bought this LimoStudio L-Bracket when I realized my camera didn't have a hot-shoe mount that I could attach this LimoStudio LED Light to...which I bought when I was talking myself out of needing a ring light (rolling my eyes here) and for vlogging in dark environments. I remember attending a beauty event at night and we couldn't even take proper videos it was so dark! I have since decided that I can also use it as a mini softbox in the typical 3-light situation with my ring light while recording (I'd have to buy another). This light is super bright so I bought the Julius Studio Diffuser that goes with it. I haven't used any of these items yet. I'm well prepared though, lol! 

Now I just need to find the time to do videos... *crickets* That is proving to be the hardest part with a 9-5 and a family. And you can have all the equipment in the world, but if you aren't engaging, it doesn't matter. So please check out and subscribe to my channel, makeupbykifana, and encourage me along. Thanks in advance!

Pics

The huge box from Amazon with my ring light in it. I cracked up.

Great ring light lighting!
Impressions Vanity Glow Me Selfie Light (left) and Neewer Ring Light (right)

You can always see if someone is using a ring light if you look into their eyes ;)